Jekyll2019-07-23T09:03:41+00:00https://thetaqing.github.io/blog//feed.xmlThetaQingApp marketing template for Jekyll.{"name"=>nil, "email"=>nil, "twitter"=>nil}Halcon学习笔记(五)几何定位+仿射+车牌识别2019-07-23T00:00:00+00:002019-07-23T00:00:00+00:00https://thetaqing.github.io/blog//2019/07/23/Halcon%E5%AD%A6%E4%B9%A0%E7%AC%94%E8%AE%B0(%E4%BA%94)%E5%87%A0%E4%BD%95%E5%AE%9A%E4%BD%8D+%E4%BB%BF%E5%B0%84+%E8%BD%A6%E7%89%8C%E8%AF%86%E5%88%AB<h3 id="定位">定位</h3>
<ul>
<li>Blob分析</li>
<li>模板匹配
<h3 id="仿射">仿射</h3>
<h4 id="使用单位矩阵求仿射矩阵">使用单位矩阵求仿射矩阵</h4>
<p><strong>示例</strong>:affine_trans_region.hdev</p>
</li>
<li>单位矩阵<code class="highlighter-rouge">hom_mat2d_identity (HomMat2DIdentity)</code></li>
<li>平移矩阵<code class="highlighter-rouge">hom_mat2d_translate()</code></li>
<li>旋转矩阵<code class="highlighter-rouge">hom_mat2d_rotate(HomMat2DIdentity, -0.3, 256, 256, HomMat2DRotate)</code>
输入是原矩阵,输出是旋转矩阵,旋转角度是顺时针0.3度,旋转中心点是(256,256)</li>
<li>缩放矩阵<code class="highlighter-rouge">hom_mat2d_scale (HomMat2DRotate, 1.5, 0.5, 256, 256, HomMat2DScale)</code>
缩放点是(256,256),(1.5,0.5)表示x轴上缩放1.5倍,y轴上缩放0.5倍</li>
<li>仿射操作
<blockquote>
<p>对区域仿射<code class="highlighter-rouge">affine_trans_region (Region, egionAffineTrans, HomMat2DScale, 'nearest_neighbor')</code>
对图像仿射<code class="highlighter-rouge">affine_trans_image()</code>
对XLD进行仿射<code class="highlighter-rouge">affine_trans_xld()</code>
……</p>
</blockquote>
</li>
</ul>
<h4 id="使用模板匹配">使用模板匹配</h4>
<p><strong>示例</strong>:check_blister.hdev</p>
<div class="highlighter-rouge"><div class="highlight"><pre class="highlight"><code>access_channel (ImageOrig, Image1, 1) 获取第一通道的图片
threshold (Image1, Region, 90, 255) 阈值化
shape_trans (Region, Blister, 'convex') 凸化
orientation_region (Blister, Phi) 测量偏移角度
area_center (Blister, Area1, Row, Column) 测量面积及中心点坐标
vector_angle_to_rigid (Row1, Column1, Phi, Row2, Column2, 0, HomMat2D) 获得图片绕(Row1,Column1)点旋转Phi后得到中心点为(Row2,Column2),偏移角度为0的图片所需要的仿射矩阵
</code></pre></div></div>
<p><img src="https://img-blog.csdnimg.cn/20190723100934325.png" alt="在这里插入图片描述" /></p>
<div class="highlighter-rouge"><div class="highlight"><pre class="highlight"><code>affine_trans_image (ImageOrig, Image2, HomMat2D, 'constant', 'false') 将仿射矩阵应用于图片
</code></pre></div></div>
<h3 id="车牌识别">车牌识别</h3>
<p><strong>1、借助助手快速识别</strong>
第一步:打开一张车牌图片<code class="highlighter-rouge">read_image (Image, 'F:/Code/picTest/CarNumber/3.jpg')</code>
第二步:转化为灰度图片 <code class="highlighter-rouge">rgb1_to_gray (Image, GrayImage)</code>
第三步:利用助手打开新的OCR
<img src="https://img-blog.csdnimg.cn/20190723141359934.png?x-oss-process=image/watermark,type_ZmFuZ3poZW5naGVpdGk,shadow_10,text_aHR0cHM6Ly9ibG9nLmNzZG4ubmV0L1RoZXJhX3Fpbmc=,size_16,color_FFFFFF,t_70" alt="在这里插入图片描述" />
并根据OCR中第2点,点击任意一个绿笔头(一般选第一个,正矩形)绘制需要读取的区域,右击鼠标确定
第四步:在OCR中第3点输入你所希望读取的文本内容
<img src="https://img-blog.csdnimg.cn/20190723141851712.png" alt="在这里插入图片描述" />
第五步:勾选OCR中第4点第一项
<img src="https://img-blog.csdnimg.cn/20190723141524162.png" alt="在这里插入图片描述" />
第六步:应用快速设置
<img src="https://img-blog.csdnimg.cn/20190723141757958.png" alt="在这里插入图片描述" />
最后得到车牌识别号
<img src="https://img-blog.csdnimg.cn/20190723141958904.png?x-oss-process=image/watermark,type_ZmFuZ3poZW5naGVpdGk,shadow_10,text_aHR0cHM6Ly9ibG9nLmNzZG4ubmV0L1RoZXJhX3Fpbmc=,size_16,color_FFFFFF,t_70" alt="在这里插入图片描述" /></p>
<p><strong>2、Blob分析+mlp分类器实现</strong>
第一步:读取图片
第二步:灰度化
第三步:翻转图片亮度<code class="highlighter-rouge">invert_image (GrayImage, ImageInvert)</code>
第四步:对灰度图片阈值化<code class="highlighter-rouge">threshold (GrayImage, Regions1, 96, 204)</code>
第五步:Blob分析提取车牌号,这里见<a href="https://blog.csdn.net/Thera_qing/article/details/96490910">halcon学习笔记(二)实现相机物体抓取</a>得到仅含有车牌号的区域,注意这里运用到了多个特征选择</p>
<div class="highlighter-rouge"><div class="highlight"><pre class="highlight"><code>connection (Regions1, ConnectedRegions)
select_shape (ConnectedRegions, SelectedRegions, ['area','row'], 'and', [0,164.27], [2945.62,191.47])
select_shape (SelectedRegions, SelectedRegions1, ['area','ratio'], 'and', [0,0], [200,2.0846])
select_shape (SelectedRegions1, SelectedRegions2, ['area','ratio','column'], 'and', [0,1.5793,138.85], [200,2,500])
</code></pre></div></div>
<p><img src="https://img-blog.csdnimg.cn/20190723142511251.png" alt="在这里插入图片描述" />
第六步:对区域进行排序<code class="highlighter-rouge">sort_region (SelectedRegions2, SortedRegions, 'character', 'true', 'column')</code>按照列对字母进行排序。
第七步:读取OCR分类器<code class="highlighter-rouge">read_ocr_class_mlp ('Industrial_0-9A-Z_NoRej.omc', OCRHandle)</code>这里需要注意的是要选<code class="highlighter-rouge">'Industrial_0-9A-Z_NoRej.omc'</code>字体,及数字0-9及字母A-Z,根据以后需求不同加以更改,每一个字体不同内容可以在OCR助手字体旁边的放大镜中看。
<img src="https://img-blog.csdnimg.cn/20190723143452562.png?x-oss-process=image/watermark,type_ZmFuZ3poZW5naGVpdGk,shadow_10,text_aHR0cHM6Ly9ibG9nLmNzZG4ubmV0L1RoZXJhX3Fpbmc=,size_16,color_FFFFFF,t_70" alt="在这里插入图片描述" />
第八步:进行分类<code class="highlighter-rouge">do_ocr_multi_class_mlp (SortedRegions, ImageInvert, OCRHandle, Class, Confidence)</code>由于这是识别字是黑的,背景是白的。所以在第三步对图片进行了翻转。
最后得到分类结果
<img src="https://img-blog.csdnimg.cn/20190723143753215.png" alt="在这里插入图片描述" />
<strong>3、定位与区域分割</strong>
如果直接在RGB情况下阈值化效果不好,考虑颜色空间的转换,RGB转化为HSV</p>
<div class="highlighter-rouge"><div class="highlight"><pre class="highlight"><code>read_image (Image, 'F:/Code/picTest/CarNumber/4.jpg') 读取图片
decompose3 (Image, Red, Green, Blue) 分解RGB通道
trans_from_rgb (Red, Green, Blue, Hue, Saturation, Intensity, 'hsv') 转化为HSV三种类型的图片
threshold (Saturation, Regions, 0, 90) 对其中最明显的图片进行阈值分割
connection (Regions, ConnectedRegions) 打散
一定要保证车牌区域是完整的,如果断开了,要么调用unionl算子将其联合成一个区域,要么先膨胀将其接上!!!
如果车牌字符与边框相连,要么重新阈值化找到没有连接的阈值;要么开运算打断
select_shape (ConnectedRegions, SelectedRegions, ['area','row'], 'and', [4041.92,186], [11826.4,354.42]) 选择车牌的大致区域
fill_up (SelectedRegions, RegionFillUp) 填充孔洞
opening_rectangle1 (RegionFillUp, RegionOpening, 20, 30) 剔除矩形外多余元素(视情况而定)
opening_circle (RegionOpening4, RegionOpening4, 3.5) 剔除多余元素
shape_trans (RegionOpening4, RegionTrans, 'rectangle2') 将形状转换成矩形
orientation_region (RegionTrans, Phi) 得到区域的偏转角度
area_center (RegionTrans, Area, Row, Column) 计算区域面积和中心点坐标
vector_angle_to_rigid (Row, Column, Phi, Row, Column, 0, HomMat2D) 得到摆正图片的仿射矩阵
affine_trans_image (Image, ImageAffineTrans, HomMat2D, 'constant', 'false') 仿射矩阵应用于图片
affine_trans_region (RegionTrans, RegionAffineTrans, HomMat2D, 'nearest_neighbor') 仿射矩阵应用于区域
reduce_domain (ImageAffineTrans, RegionAffineTrans, ImageReduced) 从图片中截取该矩形区域
rgb1_to_gray (ImageReduced, GrayImage) 将截取的区域转化为灰度图片
……后续操作即前面提到的Blob分析得到车牌字符,最后分类器识别字符
</code></pre></div></div>
<h3 id="显示">显示</h3>
<div class="highlighter-rouge"><div class="highlight"><pre class="highlight"><code>smallest_rectangle1 (RegionOpening2, Row1, Column1, Row2, Column2)
count_obj (RegionOpening2, Number)
for i := 1 to Number by 1
disp_message (WindowHandle, Class[i-1], 'image', Row2[i-1], Column1[i-1], 'green', 'false')
endfor
</code></pre></div></div>{"name"=>nil, "email"=>nil, "twitter"=>nil}定位 Blob分析 模板匹配 仿射 使用单位矩阵求仿射矩阵 示例:affine_trans_region.hdev 单位矩阵hom_mat2d_identity (HomMat2DIdentity) 平移矩阵hom_mat2d_translate() 旋转矩阵hom_mat2d_rotate(HomMat2DIdentity, -0.3, 256, 256, HomMat2DRotate) 输入是原矩阵,输出是旋转矩阵,旋转角度是顺时针0.3度,旋转中心点是(256,256) 缩放矩阵hom_mat2d_scale (HomMat2DRotate, 1.5, 0.5, 256, 256, HomMat2DScale) 缩放点是(256,256),(1.5,0.5)表示x轴上缩放1.5倍,y轴上缩放0.5倍 仿射操作 对区域仿射affine_trans_region (Region, egionAffineTrans, HomMat2DScale, 'nearest_neighbor') 对图像仿射affine_trans_image() 对XLD进行仿射affine_trans_xld() ……Halcon学习笔记(四)形态学笔记2019-07-20T00:00:00+00:002019-07-20T00:00:00+00:00https://thetaqing.github.io/blog//2019/07/20/halcon%E5%AD%A6%E4%B9%A0%E7%AC%94%E8%AE%B0(%E5%9B%9B)%E5%BD%A2%E6%80%81%E5%AD%A6%E7%AC%94%E8%AE%B0<h3 id="理论基础">理论基础</h3>
<p><strong>膨胀</strong>
圆形结构膨胀算子:<code class="highlighter-rouge">dilation_circle (WiresFilled, RegionDilation, 3.5)</code>
结构元素的中心元素在filter中只要有一个元素和目标(原来的,不实时更新)产生交集时,中心元素的值改为交集处元素。膨胀<strong>增加</strong>了元素,按照从上到下,从左到右的顺序滑动。
对灰度图像的膨胀相当于变亮</p>
<p><strong>腐蚀</strong>
圆形结构腐蚀算子:<code class="highlighter-rouge">erosion_circle (WiresFilled, RegionErosion, 3.5)</code>
结构元素的所有元素都能与目标(原来的,最初的像素分布)完全包含时才保留中心位置的元素,否则只要有一个元素没有包含,中心位置的元素就不保留。腐蚀<strong>减少</strong>像素
对灰度图像的腐蚀相当于变暗
<strong>开运算</strong>
圆形结构开运算算子:<code class="highlighter-rouge">opening_circle (WiresFilled, Balls, 15.5)</code>
先腐蚀后膨胀。开运算是断开,<strong>减少</strong>像素
对灰度图像的开运算相当于对整体变暗
<strong>闭运算</strong>
圆形结构闭运算算子:<code class="highlighter-rouge">closing_circle (WiresFilled, RegionClosing, 3.5)</code>
先膨胀后腐蚀。闭运算是连接,<strong>增加</strong>像素
对灰度图像的闭运算相当于对整体变亮
<strong>结构元素</strong>
用什么形状的结构元素就会对什么形状造成影响,即进行运算,需要提取什么形状就选择什么形状的结构元素。</p>
<blockquote>
<p>对二值图像和区域做膨胀、腐蚀等运算是改变形状,对灰度图像是改变亮度
腐蚀比开运算强度大
膨胀比闭运算强度大</p>
<p><strong>视觉处理常用框架</strong></p>
<ul>
<li>采集图像</li>
<li>预处理
中值、均值、高斯滤波
动态范围
灰度处理
翻转,图像的线性变换</li>
<li>得到特征</li>
<li>显示
<strong>凸性</strong>
任意两点相连都在区域内
tips:高斯滤波算子例程<br />
二维码识别2d_data_codes_minimize_noise.hdev</li>
</ul>
</blockquote>{"name"=>nil, "email"=>nil, "twitter"=>nil}理论基础 膨胀 圆形结构膨胀算子:dilation_circle (WiresFilled, RegionDilation, 3.5) 结构元素的中心元素在filter中只要有一个元素和目标(原来的,不实时更新)产生交集时,中心元素的值改为交集处元素。膨胀增加了元素,按照从上到下,从左到右的顺序滑动。 对灰度图像的膨胀相当于变亮Halcon学习笔记(二)图像分割2019-07-19T00:00:00+00:002019-07-19T00:00:00+00:00https://thetaqing.github.io/blog//2019/07/19/Halcon%E5%AD%A6%E4%B9%A0%E7%AC%94%E8%AE%B0(%E4%BA%8C)%E5%9B%BE%E5%83%8F%E5%88%86%E5%89%B2<h2 id="图像分割的主要方法">图像分割的主要方法</h2>
<h3 id="基于阈值的图像分割">基于阈值的图像分割</h3>
<h3 id="基于边缘的图像分割">基于边缘的图像分割</h3>
<p>###</p>{"name"=>nil, "email"=>nil, "twitter"=>nil}图像分割的主要方法 基于阈值的图像分割Halcon学习笔记(二)相机采集并提取2019-07-19T00:00:00+00:002019-07-19T00:00:00+00:00https://thetaqing.github.io/blog//2019/07/19/halcon%E5%AD%A6%E4%B9%A0%E7%AC%94%E8%AE%B0(%E4%BA%8C)%E7%9B%B8%E6%9C%BA%E9%87%87%E9%9B%86%E5%B9%B6%E6%8F%90%E5%8F%96<p><strong>主要实现相机对抓取物体的单独提取功能</strong></p>
<h3 id="第一步连接相机并生成代码">第一步:连接相机并生成代码</h3>
<p>打开halcon菜单栏的助手,选择打开新的Image Acquisition。<br />
<img src="https://img-blog.csdnimg.cn/20190719184333269.png?x-oss-process=image/watermark,type_ZmFuZ3poZW5naGVpdGk,shadow_10,text_aHR0cHM6Ly9ibG9nLmNzZG4ubmV0L1RoZXJhX3Fpbmc=,size_16,color_FFFFFF,t_70" alt="在这里插入图片描述" /><br />
点击连接,halcon会自动获取相机信息<br />
<img src="https://img-blog.csdnimg.cn/20190719184547255.png?x-oss-process=image/watermark,type_ZmFuZ3poZW5naGVpdGk,shadow_10,text_aHR0cHM6Ly9ibG9nLmNzZG4ubmV0L1RoZXJhX3Fpbmc=,size_16,color_FFFFFF,t_70" alt="在这里插入图片描述" /><br />
选择连接,–>选择采集–>实时,此时,窗口便会显示相机实时采集到的信息<br />
<img src="https://img-blog.csdnimg.cn/20190719192210130.png?x-oss-process=image/watermark,type_ZmFuZ3poZW5naGVpdGk,shadow_10,text_aHR0cHM6Ly9ibG9nLmNzZG4ubmV0L1RoZXJhX3Fpbmc=,size_16,color_FFFFFF,t_70" alt="在这里插入图片描述" /><br />
采集到合适的图片之后点击停止,选择参数<br />
<img src="https://img-blog.csdnimg.cn/20190719185554420.png?x-oss-process=image/watermark,type_ZmFuZ3poZW5naGVpdGk,shadow_10,text_aHR0cHM6Ly9ibG9nLmNzZG4ubmV0L1RoZXJhX3Fpbmc=,size_16,color_FFFFFF,t_70" alt="在这里插入图片描述" /><br />
在这里可以修改图片的参数,之后再选择代码生成,选择异步采集,插入代码,在程序窗口中,代码已经生成<br />
<img src="https://img-blog.csdnimg.cn/20190719185743559.png?x-oss-process=image/watermark,type_ZmFuZ3poZW5naGVpdGk,shadow_10,text_aHR0cHM6Ly9ibG9nLmNzZG4ubmV0L1RoZXJhX3Fpbmc=,size_16,color_FFFFFF,t_70" alt="在这里插入图片描述" /></p>
<h3 id="第二步将采集的图片转为二值图片">第二步:将采集的图片转为二值图片</h3>
<p>调用算子<code class="highlighter-rouge">rgb1_to_gray (Image, GrayImage)</code><br />
单步调试得到二值图片<br />
<img src="https://img-blog.csdnimg.cn/20190719192240825.png?x-oss-process=image/watermark,type_ZmFuZ3poZW5naGVpdGk,shadow_10,text_aHR0cHM6Ly9ibG9nLmNzZG4ubmV0L1RoZXJhX3Fpbmc=,size_16,color_FFFFFF,t_70" alt="在这里插入图片描述" /></p>
<h3 id="第三步使用全局阈值分割图片">第三步:使用全局阈值分割图片</h3>
<p>打开灰度直方图,并打开阈值<br />
<img src="https://img-blog.csdnimg.cn/20190719192321129.png?x-oss-process=image/watermark,type_ZmFuZ3poZW5naGVpdGk,shadow_10,text_aHR0cHM6Ly9ibG9nLmNzZG4ubmV0L1RoZXJhX3Fpbmc=,size_16,color_FFFFFF,t_70" alt="在这里插入图片描述" /><br />
此时窗口变为:<br />
<img src="https://img-blog.csdnimg.cn/2019071919060024.png?x-oss-process=image/watermark,type_ZmFuZ3poZW5naGVpdGk,shadow_10,text_aHR0cHM6Ly9ibG9nLmNzZG4ubmV0L1RoZXJhX3Fpbmc=,size_16,color_FFFFFF,t_70" alt="在这里插入图片描述" /><br />
移动直方图上的坐标,直到选中物体<br />
<img src="https://img-blog.csdnimg.cn/20190719192429281.png?x-oss-process=image/watermark,type_ZmFuZ3poZW5naGVpdGk,shadow_10,text_aHR0cHM6Ly9ibG9nLmNzZG4ubmV0L1RoZXJhX3Fpbmc=,size_16,color_FFFFFF,t_70" alt="在这里插入图片描述" /><br />
提醒一下,使用全局阈值来分割图片必须满足目标与背景相差较大,如果相差较近,建议使用局部阈值或动态阈值。<br />
然后点击插入代码<br />
此时程序窗口中生成了<code class="highlighter-rouge">threshold (GrayImage, Regions, 127, 255)</code>参数会根据图片变化而变化</p>
<h3 id="第四步打散">第四步:打散</h3>
<p>由于分割之后所有选中的物体都被认为是一个整体,为提取单个物体,需要对其进行打散操作<br />
调用算子<code class="highlighter-rouge">connection (Regions, ConnectedRegions)</code>并运行得到<br />
<img src="https://img-blog.csdnimg.cn/20190719193126284.png?x-oss-process=image/watermark,type_ZmFuZ3poZW5naGVpdGk,shadow_10,text_aHR0cHM6Ly9ibG9nLmNzZG4ubmV0L1RoZXJhX3Fpbmc=,size_16,color_FFFFFF,t_70" alt="在这里插入图片描述" /><br />
此时选中的物体用其他颜色进行区别实现打散。</p>
<h3 id="第五步提取">第五步:提取</h3>
<p>打开特征直方图,注意要在程序运行到打散之后再打开<br />
<img src="https://img-blog.csdnimg.cn/20190719193344287.png?x-oss-process=image/watermark,type_ZmFuZ3poZW5naGVpdGk,shadow_10,text_aHR0cHM6Ly9ibG9nLmNzZG4ubmV0L1RoZXJhX3Fpbmc=,size_16,color_FFFFFF,t_70" alt="在这里插入图片描述" /><br />
同样,选择分离的特征依据,这里以面积为例,选择颜色表示选中,这里颜色可以根据实际目标物体的情况判断,移动最小阈值轴(绿色)直到目标被选中(即仅有目标被填充为选中的颜色,这里是绿色),选择插入代码,此时程序窗口已插入:<br />
<code class="highlighter-rouge">select_shape (ConnectedRegions, SelectedRegions, 'area', 'and', 40494, 100000)</code><br />
此时便完成了全部提取物体的操作,下面可以对提取的物体做进一步操作,比如这里计算面积并获得坐标<br />
<code class="highlighter-rouge">area_center (SelectedRegions, Area, Row, Column)</code><br />
得到<br />
<img src="https://img-blog.csdnimg.cn/20190719194001683.png" alt="在这里插入图片描述" /><br />
当然也可以显示信息,但在显示之前一定要先创建窗口<br />
<code class="highlighter-rouge">dev_close_window ()</code><br />
<code class="highlighter-rouge">dev_open_window (0, 0, 512, 512, 'black', WindowHandle)</code><br />
然后再显示信息<br />
<code class="highlighter-rouge">disp_message (WindowHandle, '面积'+Area+'坐标'+Column, 'window', Row, Column, 'black', 'false')</code><br />
<strong>tips:</strong>这里如果报错,可能是没有设置可视单步调试模式,选择可视化–>更新窗口–>单步模式–>总是<br />
<img src="https://img-blog.csdnimg.cn/20190719194528574.png" alt="在这里插入图片描述" /><br />
另外在每次重新运行程序前要先关闭否则可能报错,所以在<code class="highlighter-rouge">endwhile</code>后面要加一句<br />
<code class="highlighter-rouge">close_framegrabber (AcqHandle)</code><br />
并在重新运行之前先运行一遍close语句(将运行光标绿箭头移到那一句点击运行即可)。</p>{"name"=>nil, "email"=>nil, "twitter"=>nil}主要实现相机对抓取物体的单独提取功能 第一步:连接相机并生成代码 打开halcon菜单栏的助手,选择打开新的Image Acquisition。 点击连接,halcon会自动获取相机信息 选择连接,–>选择采集–>实时,此时,窗口便会显示相机实时采集到的信息 采集到合适的图片之后点击停止,选择参数 在这里可以修改图片的参数,之后再选择代码生成,选择异步采集,插入代码,在程序窗口中,代码已经生成 第二步:将采集的图片转为二值图片 调用算子rgb1_to_gray (Image, GrayImage) 单步调试得到二值图片 第三步:使用全局阈值分割图片 打开灰度直方图,并打开阈值 此时窗口变为: 移动直方图上的坐标,直到选中物体 提醒一下,使用全局阈值来分割图片必须满足目标与背景相差较大,如果相差较近,建议使用局部阈值或动态阈值。 然后点击插入代码 此时程序窗口中生成了threshold (GrayImage, Regions, 127, 255)参数会根据图片变化而变化 第四步:打散 由于分割之后所有选中的物体都被认为是一个整体,为提取单个物体,需要对其进行打散操作 调用算子connection (Regions, ConnectedRegions)并运行得到 此时选中的物体用其他颜色进行区别实现打散。 第五步:提取 打开特征直方图,注意要在程序运行到打散之后再打开 同样,选择分离的特征依据,这里以面积为例,选择颜色表示选中,这里颜色可以根据实际目标物体的情况判断,移动最小阈值轴(绿色)直到目标被选中(即仅有目标被填充为选中的颜色,这里是绿色),选择插入代码,此时程序窗口已插入: select_shape (ConnectedRegions, SelectedRegions, 'area', 'and', 40494, 100000) 此时便完成了全部提取物体的操作,下面可以对提取的物体做进一步操作,比如这里计算面积并获得坐标 area_center (SelectedRegions, Area, Row, Column) 得到 当然也可以显示信息,但在显示之前一定要先创建窗口 dev_close_window () dev_open_window (0, 0, 512, 512, 'black', WindowHandle) 然后再显示信息 disp_message (WindowHandle, '面积'+Area+'坐标'+Column, 'window', Row, Column, 'black', 'false') tips:这里如果报错,可能是没有设置可视单步调试模式,选择可视化–>更新窗口–>单步模式–>总是 另外在每次重新运行程序前要先关闭否则可能报错,所以在endwhile后面要加一句 close_framegrabber (AcqHandle) 并在重新运行之前先运行一遍close语句(将运行光标绿箭头移到那一句点击运行即可)。Halcon学习笔记(一)之基本知识点和环境配置2019-07-17T00:00:00+00:002019-07-17T00:00:00+00:00https://thetaqing.github.io/blog//2019/07/17/halcon%E5%AD%A6%E4%B9%A0%E7%AC%94%E8%AE%B0(%E4%B8%80)%E4%B9%8B%E5%9F%BA%E6%9C%AC%E7%9F%A5%E8%AF%86%E7%82%B9%E5%92%8C%E7%8E%AF%E5%A2%83%E9%85%8D%E7%BD%AE<h2 id="image像素类型">Image像素类型</h2>
<p>边缘方向(direction):边缘梯度方向
灰度图像,byte,uint2:表示标准的灰度图像编码
Difference&Derivative,int1,int2:表示两帧图像的差异或者整型精度的偏差
2D直方图,int4:两帧图像灰度值出现的频率统计图
Derivatives,real:边缘提取和特殊的灰度值配置
傅里叶变换,complex:用频率描述图像
色调,cyclic:每个颜色都分配了一个灰度值
光流,vector_field:描述两帧连续的图像间的光流</p>
<h2 id="image像素表示方式">Image像素表示方式</h2>
<p>byte:8 bits无符号
uint2:16bits无符号
int1:8bits有符号
int2: 16bits有符号
int4:32bits有符号
direction:8bits无符号
real:32bits浮点类型
complex:每像素两个real值
cyclic:8bits无符号,且255+1=0
vector_field:两帧real类型图像描述x或者y方向的运动</p>
<h2 id="tuple">tuple</h2>
<h3 id="iconic-tuple图标数组">Iconic tuple:图标数组</h3>
<p>一个变量中包含一组数目不定的图标变量
最小的索引是1
最大的索引是元素个数
<strong>主要operations(操作)有:</strong>
显示:display
元素个数:number of elements
选择:selection
串联:concatenation
类型校验:type checking
比较:comparison</p>
<h3 id="control-tuple控制数组">Control tuple:控制数组</h3>
<p><strong>变量类型:</strong>
Integer
Real
String
<strong>变量长度:</strong>
如果长度为1,可以作为正常变量使用
第一个索引为0
最大的索引为变量长度-1</p>
<p>(物体数组)</p>
<p><strong>halcon与VC2013环境配置教程</strong>
在教程前面要记得创建x64环境,然后再用这个配置https://www.cnblogs.com/oucsheep/p/5866471.html
如果报错“头文件未添加stdafx.h”则是因为没有删除halcon生成的cpp文件</p>
<p><strong>利用Microsoft Visual Studio Installer生成MFC的exe文件</strong>
参考教程:https://jingyan.baidu.com/article/b7001fe184e4e50e7382dd4e.html
记得要在需要打包的项目中右击解决方案,选择添加->新建项目->其他项目->Visual Studio Installer->setup Project(如果没有这个插件选择联机,搜索Visual Studio Installer Project,下载并安装),然后按照上述教程,另外一篇教程也不错https://blog.csdn.net/dog123xuheyin/article/details/85008071
简而言之</p>
<ul>
<li>第一步:新建项目</li>
<li>
<p>第二步:修改参数,主要修改如下</p>
<p><img src="https://img-blog.csdnimg.cn/20190717170101322.png?x-oss-process=image/watermark,type_ZmFuZ3poZW5naGVpdGk,shadow_10,text_aHR0cHM6Ly9ibG9nLmNzZG4ubmV0L1RoZXJhX3Fpbmc=,size_16,color_FFFFFF,t_70" alt="在这里插入图片描述" /></p>
<blockquote>
<p>Author:即作者名字<br />
Manufacture:即公司名字<br />
ProductName:应用软件名字,一般与项目名相同,为区分文件名,请修改<br />
RemovePreviousVersions:是否移除旧版本,建议修改为True,否则会安装一堆<br />
TargetPlatform:x86安装或x64安装</p>
</blockquote>
</li>
<li>第三步:添加主输出</li>
<li>第四步:添加卸载文件,路径:C:\Windows\System32\msiexec.exe,图标可以在网上下,ico格式便可</li>
<li>第五步:添加快捷键,并修改msiexec.exe的编码参数,这里教程里面都有</li>
<li>第六步:右键生成</li>
<li>第七步:找到输出路径安装</li>
</ul>{"name"=>nil, "email"=>nil, "twitter"=>nil}Image像素类型 边缘方向(direction):边缘梯度方向 灰度图像,byte,uint2:表示标准的灰度图像编码 Difference&Derivative,int1,int2:表示两帧图像的差异或者整型精度的偏差 2D直方图,int4:两帧图像灰度值出现的频率统计图 Derivatives,real:边缘提取和特殊的灰度值配置 傅里叶变换,complex:用频率描述图像 色调,cyclic:每个颜色都分配了一个灰度值 光流,vector_field:描述两帧连续的图像间的光流Pytorch学习笔记(五)之tensor的高阶运算2019-07-12T00:00:00+00:002019-07-12T00:00:00+00:00https://thetaqing.github.io/blog//2019/07/12/pytorch%E5%AD%A6%E4%B9%A0%E7%AC%94%E8%AE%B0(%E4%BA%94)%E4%B9%8Btensor%E7%9A%84%E9%AB%98%E9%98%B6%E8%BF%90%E7%AE%97<h2 id="where">where</h2>
<div class="highlighter-rouge"><div class="highlight"><pre class="highlight"><code>torch.where(condition,x,y) #condition必须是tensor类型 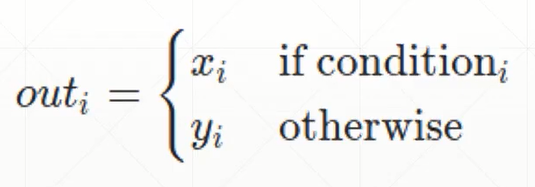 condition的维度和x,y一致,用1和0分别表示该位置的取值 例:输入:
cond = torch.tensor([[0.6, 0.7],
[0.3, 0.6]])
a = torch.tensor([[1., 1.],
[1., 1.]])
b = torch.tensor([[0., 0.],
[0., 0.]])
c = torch.where(cond > 0.5, a, b) #此时cond只有0和1的值
print(c) 输出:
tensor([[1., 1.],
[0., 1.]])
</code></pre></div></div>
<p>高度并行</p>
<h2 id="gather">gather</h2>
<div class="highlighter-rouge"><div class="highlight"><pre class="highlight"><code>torch.gather(input, dim, index, out=None) 相当于查表操作 举例:
prob = torch.randn(4, 10)
idx = prob.topk(dim=1, k=3) # prob在维度1中前三个最大的数,一共有4行,返回值和对应的下标
print("all of topk idx: ", idx)
idx = idx[1]
print("idx[1]: ", idx)
label = torch.arange(10) + 100 # 举个例子,这里的列表表示为
# 0对应于100,1对应于101,以此类推,根据实际应用修改
result = torch.gather(label.expand(4, 10), dim=1, index=idx.long()) # lable相当于one-hot编码,index表示索引
# 换而言是是y与x的函数映射关系,index表示x
print("result:", result)
</code></pre></div></div>
<p>输出结果为:</p>
<div class="highlighter-rouge"><div class="highlight"><pre class="highlight"><code>all of topk idx: torch.return_types.topk(
values=tensor([[0.7878, 0.2928, 0.2062],
[0.2524, 0.2094, 0.0350],
[1.5519, 0.8405, 0.7521],
[1.3380, 0.9290, 0.5655]]),
indices=tensor([[2, 0, 8],
[9, 5, 6],
[1, 2, 0],
[3, 7, 8]]))
idx[1]: tensor([[2, 0, 8],
[9, 5, 6],
[1, 2, 0],
[3, 7, 8]])
result: tensor([[102, 100, 108],
[109, 105, 106],
[101, 102, 100],
[103, 107, 108]])
</code></pre></div></div>{"name"=>nil, "email"=>nil, "twitter"=>nil}wherePytorch学习笔记(四)之张量的高阶操作2019-07-11T00:00:00+00:002019-07-11T00:00:00+00:00https://thetaqing.github.io/blog//2019/07/11/pytorch%E5%AD%A6%E4%B9%A0%E7%AC%94%E8%AE%B0(%E5%9B%9B)%E4%B9%8B%E5%BC%A0%E9%87%8F%E7%9A%84%E9%AB%98%E9%98%B6%E6%93%8D%E4%BD%9C<h2 id="broadingcasting自动扩展">Broadingcasting自动扩展</h2>
<p><strong>特点:</strong>
实现维度扩展
不需要拷贝数据
<strong>原理:</strong>
先在高维度上un squeeze一个维度,然后将维度为1的expend到相对应的维度
<img src="https://img-blog.csdnimg.cn/2019071109085572.png?x-oss-process=image/watermark,type_ZmFuZ3poZW5naGVpdGk,shadow_10,text_aHR0cHM6Ly9ibG9nLmNzZG4ubmV0L1RoZXJhX3Fpbmc=,size_16,color_FFFFFF,t_70" alt="在这里插入图片描述" />
<strong>使用条件:</strong>
<strong>从低维度开始匹配</strong>所以如果操作是中间维度的运算,则需要手动unsqueeze低维度为1.</p>
<ol>
<li>对应运算的维度要么为1,为1表示适用于所有其他维度</li>
<li>对应运算的维度与另一个操作数据的对应维度相同</li>
<li>对应维度不存在,空值,broadcast会自动unsqueeze</li>
</ol>
<p>如:A = [class][students][scores] = [4][32][8]</p>
<p>B~1~ = [1]
此时表示对每个班的每个学生的每门课程分数都加1分</p>
<p>B~2~ = [8]
此时表示对每个班的每个学生的八门课程加上对应的分数(如:01010340)</p>
<p>B~3~ = [32][1]
因为要对student进行操作,所有低维度的1需要手动unsqueeze</p>
<p>B~4~ = [4]
此时不满足条件,无法判断是哪四门课程</p>
<h2 id="拼接与拆分">拼接与拆分</h2>
<h3 id="cat拼接">cat()拼接</h3>
<p>在原来的基础上叠加</p>
<div class="highlighter-rouge"><div class="highlight"><pre class="highlight"><code>in: a = torch.rand(4, 32, 8)
in: b = torch.rand(5, 32, 8) #除拼接维度外其他维度保持一致
in: torch.cat([a, b], dim=0).shape
out: torch.Size([9, 32, 8]) dim表示的是在第几个维度拼接,其他维度保持一致
</code></pre></div></div>
<h3 id="stack">stack()</h3>
<p>创建一个新的维度</p>
<div class="highlighter-rouge"><div class="highlight"><pre class="highlight"><code>in: b = torch.rand(4, 32, 8)
in: c = torch.stack([a,b], dim = 0)
in: print(c.shape)
out: torch.Size([2, 4, 32, 8])
</code></pre></div></div>
<p>两个数据的维度必须完全一样,此时c[0]表示a,c[1]表示b</p>
<h3 id="split">split()</h3>
<p>根据长度拆分
<img src="https://img-blog.csdnimg.cn/2019071119444923.png?x-oss-process=image/watermark,type_ZmFuZ3poZW5naGVpdGk,shadow_10,text_aHR0cHM6Ly9ibG9nLmNzZG4ubmV0L1RoZXJhX3Fpbmc=,size_16,color_FFFFFF,t_70" alt="在这里插入图片描述" />
拆分的长度一定要足够</p>{"name"=>nil, "email"=>nil, "twitter"=>nil}Broadingcasting自动扩展 特点: 实现维度扩展 不需要拷贝数据 原理: 先在高维度上un squeeze一个维度,然后将维度为1的expend到相对应的维度 使用条件: 从低维度开始匹配所以如果操作是中间维度的运算,则需要手动unsqueeze低维度为1. 对应运算的维度要么为1,为1表示适用于所有其他维度 对应运算的维度与另一个操作数据的对应维度相同 对应维度不存在,空值,broadcast会自动unsqueezePytorch学习笔记之tensor的基本运算2019-07-11T00:00:00+00:002019-07-11T00:00:00+00:00https://thetaqing.github.io/blog//2019/07/11/pytorch%E5%AD%A6%E4%B9%A0%E7%AC%94%E8%AE%B0%E4%B9%8Btensor%E7%9A%84%E5%9F%BA%E6%9C%AC%E8%BF%90%E7%AE%97<h2 id="加减乘除">加减乘除</h2>
<p><img src="https://img-blog.csdnimg.cn/20190711195108688.png?x-oss-process=image/watermark,type_ZmFuZ3poZW5naGVpdGk,shadow_10,text_aHR0cHM6Ly9ibG9nLmNzZG4ubmV0L1RoZXJhX3Fpbmc=,size_16,color_FFFFFF,t_70" alt="在这里插入图片描述" /></p>
<h2 id="矩阵相乘">矩阵相乘</h2>
<p>torch.mm 只适用于2d,不推荐
torch.matmul 推荐使用
@ 运算符重载
<img src="https://img-blog.csdnimg.cn/2019071120060893.png?x-oss-process=image/watermark,type_ZmFuZ3poZW5naGVpdGk,shadow_10,text_aHR0cHM6Ly9ibG9nLmNzZG4ubmV0L1RoZXJhX3Fpbmc=,size_16,color_FFFFFF,t_70" alt="在这里插入图片描述" /></p>
<h2 id="次方运算">次方运算</h2>
<div class="highlighter-rouge"><div class="highlight"><pre class="highlight"><code>a = torch.full([2,2],3)
aa = a.pow(2)
</code></pre></div></div>
<p>操作运算如下:</p>
<p><code class="highlighter-rouge">a.pow(n)</code> 表示a^n^
<code class="highlighter-rouge">a**n</code> 表示a^n^
<code class="highlighter-rouge">aa.sqrt()</code> 表示aa ^1/2^
<code class="highlighter-rouge">aa.rsqrt()</code> 表示aa^1/3^
注意这里没有torch.</p>
<h2 id="幂对数">幂/对数</h2>
<div class="highlighter-rouge"><div class="highlight"><pre class="highlight"><code>a = torch.exp(torch.one(2,2)) #指数运算
b = torch.log(a) #对数运算,默认底数为e
c = torch.log2(a) #对数运算,改变底数
</code></pre></div></div>
<h2 id="近似值">近似值</h2>
<p>向下取整,floor()
向上取整,ceil()
取整数部分,trunc()
取小数部分,frac()
四舍五入法,round()
<img src="https://img-blog.csdnimg.cn/20190711202056683.png?x-oss-process=image/watermark,type_ZmFuZ3poZW5naGVpdGk,shadow_10,text_aHR0cHM6Ly9ibG9nLmNzZG4ubmV0L1RoZXJhX3Fpbmc=,size_16,color_FFFFFF,t_70" alt="在这里插入图片描述" /></p>
<h2 id="clamp">clamp()</h2>
<ul>
<li>clamp(min)</li>
<li>clamp(min,max)</li>
</ul>
<p><img src="https://img-blog.csdnimg.cn/20190711202657582.png?x-oss-process=image/watermark,type_ZmFuZ3poZW5naGVpdGk,shadow_10,text_aHR0cHM6Ly9ibG9nLmNzZG4ubmV0L1RoZXJhX3Fpbmc=,size_16,color_FFFFFF,t_70" alt="在这里插入图片描述" /></p>
<h1 id="数据统计">数据统计</h1>
<h2 id="norm范数">norm范数</h2>
<div class="highlighter-rouge"><div class="highlight"><pre class="highlight"><code>a.norm(n,dim=m) #n表示求n的范数,m表示第m维
</code></pre></div></div>
<p><img src="https://img-blog.csdnimg.cn/20190711203928869.png?x-oss-process=image/watermark,type_ZmFuZ3poZW5naGVpdGk,shadow_10,text_aHR0cHM6Ly9ibG9nLmNzZG4ubmV0L1RoZXJhX3Fpbmc=,size_16,color_FFFFFF,t_70" alt="在这里插入图片描述" /></p>
<h2 id="meansumminmaxprod累乘argmax返回最大值的下标argmin返回最小值的索引">mean(),sum(),min(),max(),prod()累乘,argmax()返回最大值的下标,argmin()返回最小值的索引</h2>
<p>argmax(dim=n)表示在第n维的最大值,如果不指定维度,则会打平为一维数据,返回所有数据的最大值的索引。
<img src="https://img-blog.csdnimg.cn/20190711204813147.png?x-oss-process=image/watermark,type_ZmFuZ3poZW5naGVpdGk,shadow_10,text_aHR0cHM6Ly9ibG9nLmNzZG4ubmV0L1RoZXJhX3Fpbmc=,size_16,color_FFFFFF,t_70" alt="在这里插入图片描述" /></p>
<h2 id="dimkeepdim">dim,keepdim</h2>
<p>keepdim表示维度信息和原来的一样
<img src="https://img-blog.csdnimg.cn/20190711205535691.png?x-oss-process=image/watermark,type_ZmFuZ3poZW5naGVpdGk,shadow_10,text_aHR0cHM6Ly9ibG9nLmNzZG4ubmV0L1RoZXJhX3Fpbmc=,size_16,color_FFFFFF,t_70" alt="在这里插入图片描述" /></p>
<h2 id="top-kk-th">Top-k/k-th</h2>
<div class="highlighter-rouge"><div class="highlight"><pre class="highlight"><code>a.topk(k,dim=n, largest=False) #k表示前k个,dim表示维度,largest表示最大值,
默认True,要得到最小值就改为Flase a.kthvalue(k,dim=n) #表示第n维的第k小的值  ## 比较 `>,>=,<,<=,!=,==` 判断每一个元素是否相等`torch.eq(a,b)`,返回维度相同,值为0/1的矩阵 判断整个数据是否相等`torch.equal(a,b)`,返回True或者False
</code></pre></div></div>{"name"=>nil, "email"=>nil, "twitter"=>nil}加减乘除 矩阵相乘 torch.mm 只适用于2d,不推荐 torch.matmul 推荐使用 @ 运算符重载 次方运算Pytorch学习笔记之tensor的基本操作2019-07-10T00:00:00+00:002019-07-10T00:00:00+00:00https://thetaqing.github.io/blog//2019/07/10/pytorch%E5%AD%A6%E4%B9%A0%E7%AC%94%E8%AE%B0%E4%B9%8Btensor%E7%9A%84%E5%9F%BA%E6%9C%AC%E6%93%8D%E4%BD%9C<h2 id="创建tensor">创建tensor</h2>
<ol>
<li>从numpy导入</li>
</ol>
<p><img src="https://img-blog.csdnimg.cn/20190710153332121.png?x-oss-process=image/watermark,type_ZmFuZ3poZW5naGVpdGk,shadow_10,text_aHR0cHM6Ly9ibG9nLmNzZG4ubmV0L1RoZXJhX3Fpbmc=,size_16,color_FFFFFF,t_70" alt="numpy导入" /></p>
<ol>
<li>从list里面导入</li>
</ol>
<p><img src="https://img-blog.csdnimg.cn/201907101534291.png?x-oss-process=image/watermark,type_ZmFuZ3poZW5naGVpdGk,shadow_10,text_aHR0cHM6Ly9ibG9nLmNzZG4ubmV0L1RoZXJhX3Fpbmc=,size_16,color_FFFFFF,t_70" alt="在这里插入图片描述" />
<strong>tips:</strong> orch.tensor()里面的参数只能是numpy数据或list,即现成的数据;torch.Tensor/FloatTensor()参数为数据的维度,如果是接收现成的数据,要用list形式,如第四行表示方法(不建议使用,易混淆),如果是torch.Tensor/FloatTensor(2,3)表示数据shape为2*3</p>
<ol>
<li>
<p>创建未初始化数据,即申请内存空间</p>
<p>三种方法,在数据使用前记得覆盖原有的随机初始化的值,小括号内的参数均表示数据的维度,即shape
<img src="https://img-blog.csdnimg.cn/20190710154728620.png?x-oss-process=image/watermark,type_ZmFuZ3poZW5naGVpdGk,shadow_10,text_aHR0cHM6Ly9ibG9nLmNzZG4ubmV0L1RoZXJhX3Fpbmc=,size_16,color_FFFFFF,t_70" alt="在这里插入图片描述" />
<strong>Tips:默认类型</strong>
设置默认数据类型的方法:</p>
<p>torch.set_default_tensor_type(torch.DoubleTensor)</p>
<p>否则默认数据类型为torch.FloatTensor</p>
</li>
<li>
<p>随机初始化</p>
<p>rand()表示在[0,1]之间均匀采样
rand_like()的参数是tensor
randint(min,max,shape)
randn(shape)表示正态分布的随机数据
normal(mean,std)
<img src="https://img-blog.csdnimg.cn/20190710161307163.png?x-oss-process=image/watermark,type_ZmFuZ3poZW5naGVpdGk,shadow_10,text_aHR0cHM6Ly9ibG9nLmNzZG4ubmV0L1RoZXJhX3Fpbmc=,size_16,color_FFFFFF,t_70" alt="在这里插入图片描述" /></p>
</li>
<li>其他常用API
full(shape, num) 生成一个全为num的,shape为shape的数
arange/range(min,max,step)
linspace/logspace(min,max,total_num)
ones/zeros/eye(shape),其中eye()只能是一维或两维
randperm(num)随机打散num个数
<h2 id="索引与切片">索引与切片</h2>
</li>
<li>下标索引
<img src="https://img-blog.csdnimg.cn/20190710162547570.png?x-oss-process=image/watermark,type_ZmFuZ3poZW5naGVpdGk,shadow_10,text_aHR0cHM6Ly9ibG9nLmNzZG4ubmV0L1RoZXJhX3Fpbmc=,size_16,color_FFFFFF,t_70" alt="在这里插入图片描述" /></li>
<li>切片
<img src="https://img-blog.csdnimg.cn/20190710162846681.png?x-oss-process=image/watermark,type_ZmFuZ3poZW5naGVpdGk,shadow_10,text_aHR0cHM6Ly9ibG9nLmNzZG4ubmV0L1RoZXJhX3Fpbmc=,size_16,color_FFFFFF,t_70" alt="在这里插入图片描述" /></li>
<li>隔行采样
<img src="https://img-blog.csdnimg.cn/20190710163136926.png?x-oss-process=image/watermark,type_ZmFuZ3poZW5naGVpdGk,shadow_10,text_aHR0cHM6Ly9ibG9nLmNzZG4ubmV0L1RoZXJhX3Fpbmc=,size_16,color_FFFFFF,t_70" alt="在这里插入图片描述" />
<strong>两个冒号连在一起表示隔行取样::</strong>,中间没有逗号</li>
<li>具体维度下的采样
<img src="https://img-blog.csdnimg.cn/20190710163648259.png?x-oss-process=image/watermark,type_ZmFuZ3poZW5naGVpdGk,shadow_10,text_aHR0cHM6Ly9ibG9nLmNzZG4ubmV0L1RoZXJhX3Fpbmc=,size_16,color_FFFFFF,t_70" alt="在这里插入图片描述" /></li>
<li><strong>…</strong>任意多的维度
<img src="https://img-blog.csdnimg.cn/20190710163852566.png?x-oss-process=image/watermark,type_ZmFuZ3poZW5naGVpdGk,shadow_10,text_aHR0cHM6Ly9ibG9nLmNzZG4ubmV0L1RoZXJhX3Fpbmc=,size_16,color_FFFFFF,t_70" alt="在这里插入图片描述" />
主要用在取中间的全部,但是最后一个维度另外操作,比如隔行取样</li>
<li>掩码索引
使用不多,因为会把数据打平
<img src="https://img-blog.csdnimg.cn/20190710164644678.png?x-oss-process=image/watermark,type_ZmFuZ3poZW5naGVpdGk,shadow_10,text_aHR0cHM6Ly9ibG9nLmNzZG4ubmV0L1RoZXJhX3Fpbmc=,size_16,color_FFFFFF,t_70" alt="在这里插入图片描述" /></li>
<li>打平索引
使用不多
<img src="https://img-blog.csdnimg.cn/20190710164844341.png?x-oss-process=image/watermark,type_ZmFuZ3poZW5naGVpdGk,shadow_10,text_aHR0cHM6Ly9ibG9nLmNzZG4ubmV0L1RoZXJhX3Fpbmc=,size_16,color_FFFFFF,t_70" alt="在这里插入图片描述" />
<h2 id="维度变换">维度变换</h2>
<p>操作方法</p>
</li>
<li>
<p>view/reshape(),功能一样
只要保证总的数据维度不变(1.)
忽略位置信息,通道信息,适合全连接层(2.)
只关注宽的信息,把所有照片的行和通道信息合并不关注(3.)
照片和通道信息合并,不关注来自哪张照片和哪个通道,只看行列信息(4.)
恢复数据时必须满足之前的维度信息
<img src="https://img-blog.csdnimg.cn/20190710171406429.png?x-oss-process=image/watermark,type_ZmFuZ3poZW5naGVpdGk,shadow_10,text_aHR0cHM6Ly9ibG9nLmNzZG4ubmV0L1RoZXJhX3Fpbmc=,size_16,color_FFFFFF,t_70" alt="在这里插入图片描述" /></p>
</li>
<li>
<p>squeeze()/unsqueeze()
<strong>unsqueeze()</strong>
index为正数,则在index之前插入,index是负数,则在index位置之后插入。前后按照正常的从左到右,右边是后面,<strong>插入的是是维度</strong>
<img src="https://img-blog.csdnimg.cn/20190710172412808.png?x-oss-process=image/watermark,type_ZmFuZ3poZW5naGVpdGk,shadow_10,text_aHR0cHM6Ly9ibG9nLmNzZG4ubmV0L1RoZXJhX3Fpbmc=,size_16,color_FFFFFF,t_70" alt="在这里插入图片描述" />
<img src="https://img-blog.csdnimg.cn/20190710173311599.png?x-oss-process=image/watermark,type_ZmFuZ3poZW5naGVpdGk,shadow_10,text_aHR0cHM6Ly9ibG9nLmNzZG4ubmV0L1RoZXJhX3Fpbmc=,size_16,color_FFFFFF,t_70" alt="在这里插入图片描述" />
<strong>squeeze()</strong>
<img src="https://img-blog.csdnimg.cn/20190710175654824.png?x-oss-process=image/watermark,type_ZmFuZ3poZW5naGVpdGk,shadow_10,text_aHR0cHM6Ly9ibG9nLmNzZG4ubmV0L1RoZXJhX3Fpbmc=,size_16,color_FFFFFF,t_70" alt="在这里插入图片描述" /></p>
</li>
<li>
<p>expand/repeat()
<strong>expend()</strong>只能将原来是1的地方变为N,-1表示保持不变
不会主动复制数据,推荐
<img src="https://img-blog.csdnimg.cn/20190710192301568.png?x-oss-process=image/watermark,type_ZmFuZ3poZW5naGVpdGk,shadow_10,text_aHR0cHM6Ly9ibG9nLmNzZG4ubmV0L1RoZXJhX3Fpbmc=,size_16,color_FFFFFF,t_70" alt="在这里插入图片描述" /></p>
</li>
<li>
<p><strong>repeat()</strong>参数表示对应位置拷贝的次数</p>
<p>不推荐,因为会更改memory,占有内存变多,不能使用原来的数据
<img src="https://img-blog.csdnimg.cn/20190710192535470.png?x-oss-process=image/watermark,type_ZmFuZ3poZW5naGVpdGk,shadow_10,text_aHR0cHM6Ly9ibG9nLmNzZG4ubmV0L1RoZXJhX3Fpbmc=,size_16,color_FFFFFF,t_70" alt="在这里插入图片描述" /></p>
</li>
<li>** .t()**</li>
</ol>
矩阵的转置,只能适用于二维矩阵
<ol>
<li><strong>Transpose()</strong> 一次只能两两交换<img src="https://img-blog.csdnimg.cn/20190710194139728.png?x-oss-process=image/watermark,type_ZmFuZ3poZW5naGVpdGk,shadow_10,text_aHR0cHM6Ly9ibG9nLmNzZG4ubmV0L1RoZXJhX3Fpbmc=,size_16,color_FFFFFF,t_70" alt="在这里插入图片描述" /></li>
<li><strong>permute()</strong>参数对应依次表示变换之前的下标
<img src="https://img-blog.csdnimg.cn/20190710194744165.png" alt="在这里插入图片描述" /></li>
</ol>{"name"=>nil, "email"=>nil, "twitter"=>nil}创建tensorPytorch学习笔记之基本数据类型2019-07-10T00:00:00+00:002019-07-10T00:00:00+00:00https://thetaqing.github.io/blog//2019/07/10/pytorch%E5%AD%A6%E4%B9%A0%E7%AC%94%E8%AE%B0%E4%B9%8B%E5%9F%BA%E6%9C%AC%E6%95%B0%E6%8D%AE%E7%B1%BB%E5%9E%8B<h2 id="数据类型">数据类型</h2>
<p><img src="https://img-blog.csdnimg.cn/20190710094520590.png?x-oss-process=image/watermark,type_ZmFuZ3poZW5naGVpdGk,shadow_10,text_aHR0cHM6Ly9ibG9nLmNzZG4ubmV0L1RoZXJhX3Fpbmc=,size_16,color_FFFFFF,t_70" alt="python与pytorch的数据类型对照" />
那么怎么表达string呢?</p>
<ul>
<li>one-hot
[1 0] dog [0 1] cat
每一个位置代表一个意思,相关性不强</li>
<li>Embedding编码</li>
</ul>
<p><img src="https://img-blog.csdnimg.cn/20190710095455293.png?x-oss-process=image/watermark,type_ZmFuZ3poZW5naGVpdGk,shadow_10,text_aHR0cHM6Ly9ibG9nLmNzZG4ubmV0L1RoZXJhX3Fpbmc=,size_16,color_FFFFFF,t_70" alt="Data type" />
打勾部分是常用的类型</p>
<h2 id="数据表示">数据表示</h2>
<ul>
<li>维度为0的标量用torch.tensor(1.3)表示。</li>
<li>维度为1的向量/张量
<img src="https://img-blog.csdnimg.cn/20190710101239635.png?x-oss-process=image/watermark,type_ZmFuZ3poZW5naGVpdGk,shadow_10,text_aHR0cHM6Ly9ibG9nLmNzZG4ubmV0L1RoZXJhX3Fpbmc=,size_16,color_FFFFFF,t_70" alt="维度为1的张量创建方法" /></li>
<li>维度为2 的向量表示
<img src="https://img-blog.csdnimg.cn/2019071010455878.png?x-oss-process=image/watermark,type_ZmFuZ3poZW5naGVpdGk,shadow_10,text_aHR0cHM6Ly9ibG9nLmNzZG4ubmV0L1RoZXJhX3Fpbmc=,size_16,color_FFFFFF,t_70" alt="二维向量" /></li>
<li>维度为3
<img src="https://img-blog.csdnimg.cn/2019071011322131.png?x-oss-process=image/watermark,type_ZmFuZ3poZW5naGVpdGk,shadow_10,text_aHR0cHM6Ly9ibG9nLmNzZG4ubmV0L1RoZXJhX3Fpbmc=,size_16,color_FFFFFF,t_70" alt="在这里插入图片描述" />
适合处理RNN,文字处理</li>
<li>维度为4
<img src="https://img-blog.csdnimg.cn/20190710113044543.png?x-oss-process=image/watermark,type_ZmFuZ3poZW5naGVpdGk,shadow_10,text_aHR0cHM6Ly9ibG9nLmNzZG4ubmV0L1RoZXJhX3Fpbmc=,size_16,color_FFFFFF,t_70" alt="维度为4" />
适合神经网络,图像处理</li>
</ul>{"name"=>nil, "email"=>nil, "twitter"=>nil}数据类型 那么怎么表达string呢? one-hot [1 0] dog [0 1] cat 每一个位置代表一个意思,相关性不强 Embedding编码